Build Your Own Stone Wall
Overview
Stonewalls are a smart and relatively cheap way to add to a home’s decorative and resale value – permanently. Unlike most home improvements, stonewalls are apt to look BETTER with age.
Walls can be used along a home’s street fronting, around a patio or to set off different garden levels. Quartzite, bluestone, sandstone and many other varieties are widely available in precut, lightweight sizes that invite do-it-your-selfers to take a crack at wall building.
Four Types
For the home mason there are essentially four types of walls. Each requires somewhat different tools and a different construction technique. Freestanding walls may be either wet concrete between the stones) or dry (no concrete). For retaining walls the same breakdown applies; wet and dry.
Construction
The dry, gravity type wall depends on the weight and friction of one stone upon the other for stability. For this reason, the stones would be flat and wedged tightly together. The alternate method calls for cement mortar to bind the stones together.
In either type, batter boards, twine, and hammer are needed. For a wet wall, a trowel, broom and tub for mixing the cement are also required. For the free standing wet wall, dig a trench a few inches wider than the base of the wall and to a depth of the frost level in the locality. Pour a footing 4″-6″ below finished grade.
When constructing a dry wall, use large stones for the first layer or “course.”
These stones should be bedded below the grade on a solid layer of crusher run.
Next, string lines to keep the face of the wall straight.
Batter Boards
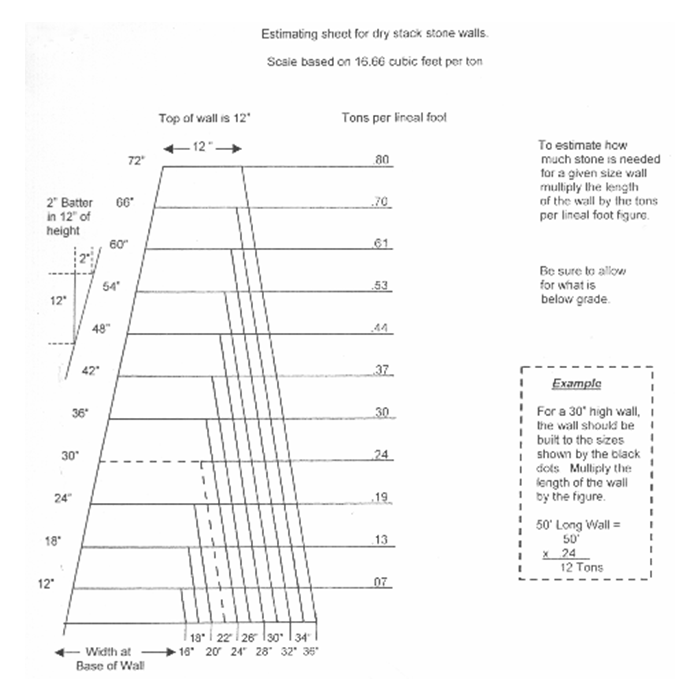
Now, construct two batter boards. These are wedge-shaped, flat on one side, sloping on the other. When driven into the ground at the edge of the wall they afford a quick check on the inward slope of the stones. For freestanding walls, the slope should be one inch for every two feet in height. For dry retaining, two inches for each foot; for wet retaining walls, one inch for each foot. Be sure the batter board is at right angles with the ground by checking with a level.
Laying Stones
For best results, lay stones as they would lie naturally on the ground. Do not turn them on end. Fit them together as in a jig saw puzzle and keep the stones level on top. Try to build the wall up all at the same time for the entire length of the wall rather than building up first one section then another.
On the higher side, install a continuous drain tile filled over and around with course gravel. Cover with landscaping fabric to prevent soil from coming through the wall. Shrubbery and other plantings should be placed on the hill to check soil erosion.
Cementing
Make the mortar mix from one part cement and two parts sand. Do not use dehydrated lime as it discolors the stone. Mix completely while dry, then add water until mortar slips cleanly for the hoe. You have about an hour of workable time before mortar sets. Test several stones in a section to see how they set before cementing. Some stones should be laid at right angles to strengthen the wall across. Save flattest stones for the top.
Before applying mortar, brush water on the stones to aid in the binding. Use enough mortar to fill the joints completely. After laying a section, poke out mortar from between the stones to a depth of a half to three inches. Brush off excess cement. When building a retaining wall, it is important to leave “weep holes” to allow water to drain from the upper level.
As a guide, a 94lb bag of Portland Cement equals approximately 8 shovels of sand. For example, a 2-to-1 cement mix as described above would be 16 shovels of sand and one bag of cement.